WHAT'S NEW?
Loading...
Showing posts with label Install. Show all posts


Unicornscan is no longer packaged with Kali Linux 1.0. One of our scripts (onetwopunch.sh) happens to use it, so I went about building Unicornscan from source. I ran into a couple of snags when building it, but I've documented it here to make things easier for others.
Unicornscan requires flex which isn't installed in Kali Linux 1.0, so install it:


?
1
root@kali# apt-get install flex

This should install smoothly, and once it's, download the latest version of Unicornscan from http://www.unicornscan.org/. Unpack it and build as follows:

?
1
root@kali# ./configure CFLAGS=-D_GNU_SOURCE && make && make install

Once it's done, you'll find unicornscan in /usr/local/bin


Nessus is a vulnerability scanner. My first disappointment  with Kali was that it excluded nessus from its vulnerability scanning tools. However it ca be installed in the following manner. First download the nessus debian package from the website ( here ). Go to the directory into which the package has been downloaded. I downloaded mine to Desktop. Then type the command dpkg -i “package name” as shown below.
Image
This will unpack all the nessus packages. Then what we need is only to start the service using the command service nessusd start. This will start the nessus service.
Image
Then we can just go to our browser as below and our nessus is ready to work. Nessus functions on port 8834 on the localhost.
Image


Virtualization is great way to deal with multiple operation systems on a machine.
In this article, let’s see how to install Kali Linux 1.0.6 in Virtual Box. VirtualBox is an open source general-purpose full virtualizer for x86 hardware, targeted at server, desktop and embedded use.
Kali Linux can be downloaded from here and VirtualBox can be downloaded from here. In this article, I am using latest version 4.3.6 of virtualbox.

Steps:

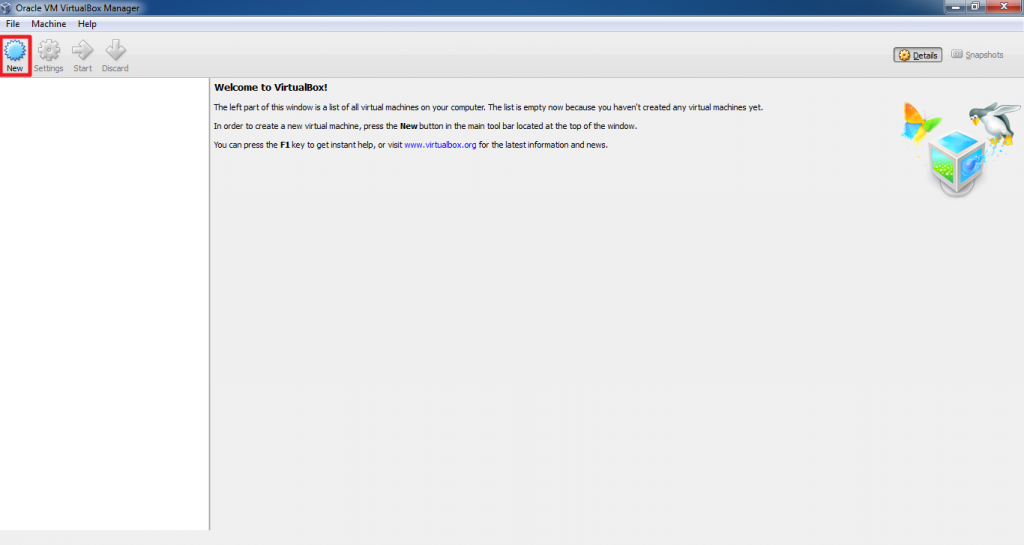
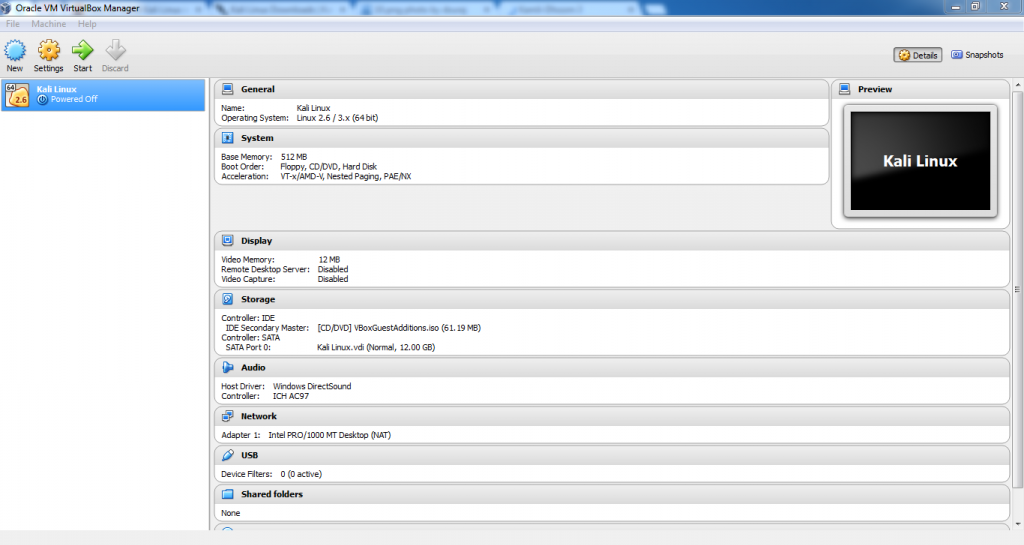
1. After installing virtualbox, open it. Click on New to create a new virtual machine.
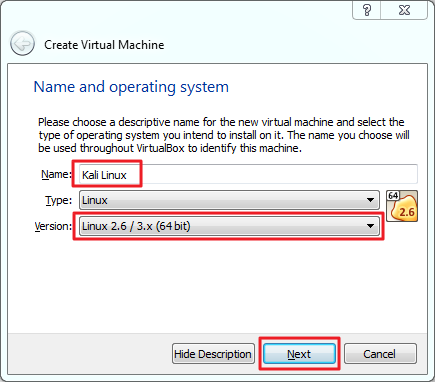
2. Enter the name “Kali Linux”, type and version was auto populated. Change version to Linux 2.6/3.x (64 bit) If you are installing 64 bit version of Kali linux. Click Next.
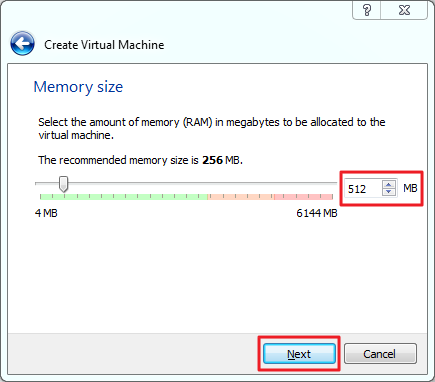
3. Select the memory size from the screen and click Next. Default is 256 MB.
4. From the next screen, you can either create a new virtual hard drive or use existing virtual drive. Default size is 8 GB, but I recommend to keep it to more than 10 GB. Click create button.
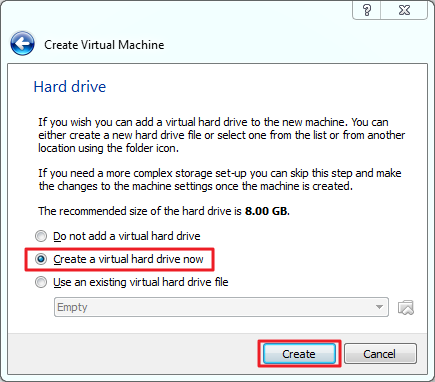
5. Now you need to select a hard drive file type. I recommend to keep it default to VDI. Click next.
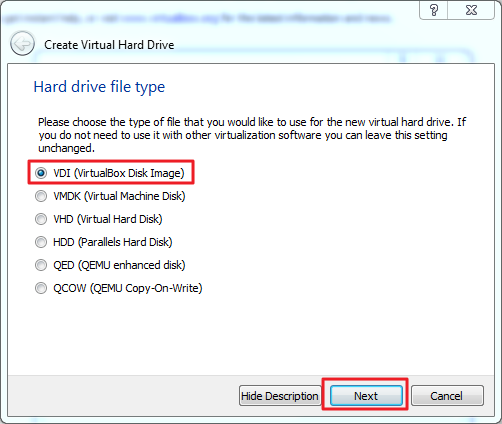
6. From the “Storage on physical drive”, keep the default option which is “dynamic allocated” and click next.
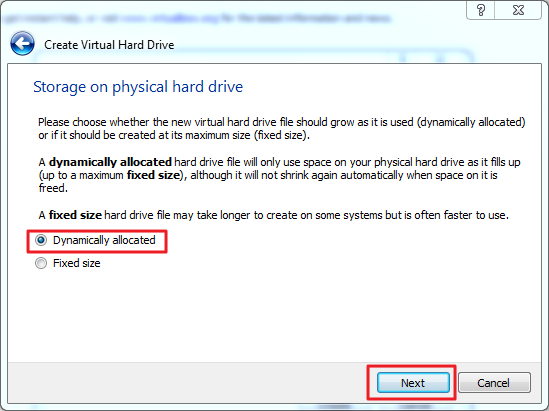
7. From the “File location and size” window, set the virtual machine drive size to 12 GB and click create. It will create virtual machine.
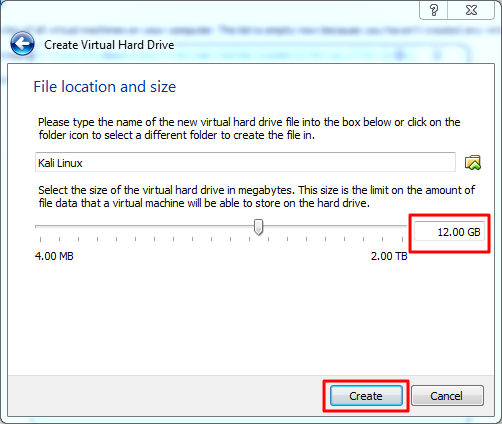
Now it’s time to install Kali Linux.
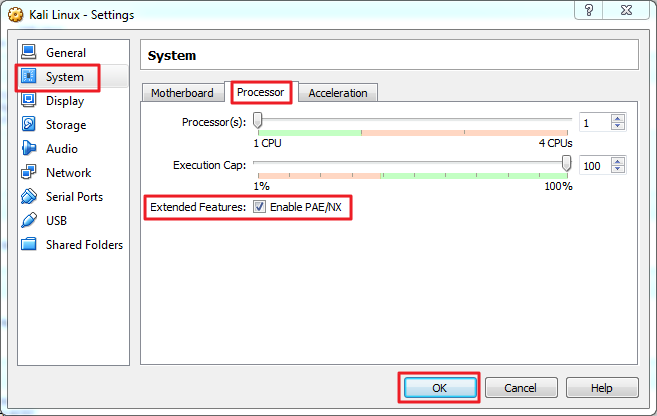
8. From the main screen, right click on the newly created virtual machine “kali linux” and select “Settings..”. Click on System >> Processor and check the Enable PAE/NX setting and click OK as shown in the following screenshot. To know more about PAE and NX click here.
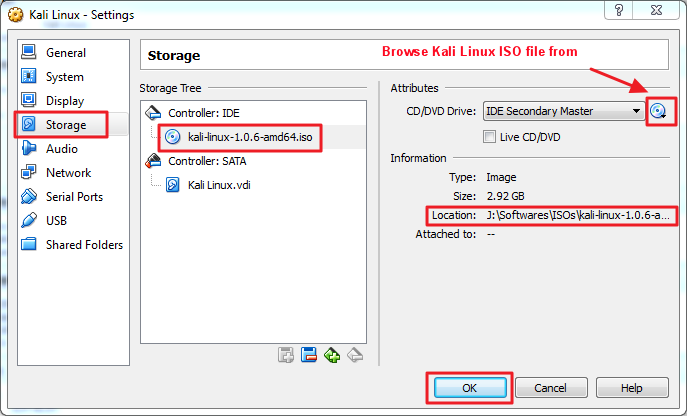
9. Then Select Storage >> Controller : IDE from the settings windows and browse for the ISO file for the Kali linux as shown below. Click OK.
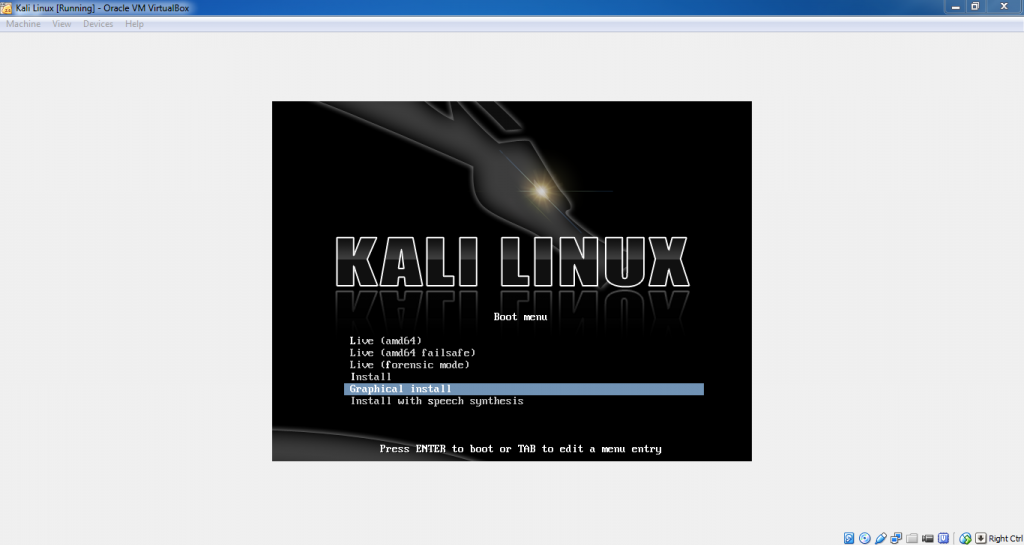
10. From main screen, start your newly created virtual machine “Kali Linux”. Select “Graphical Install” from the following screen to start the installation.
11. Select the appropriate language.
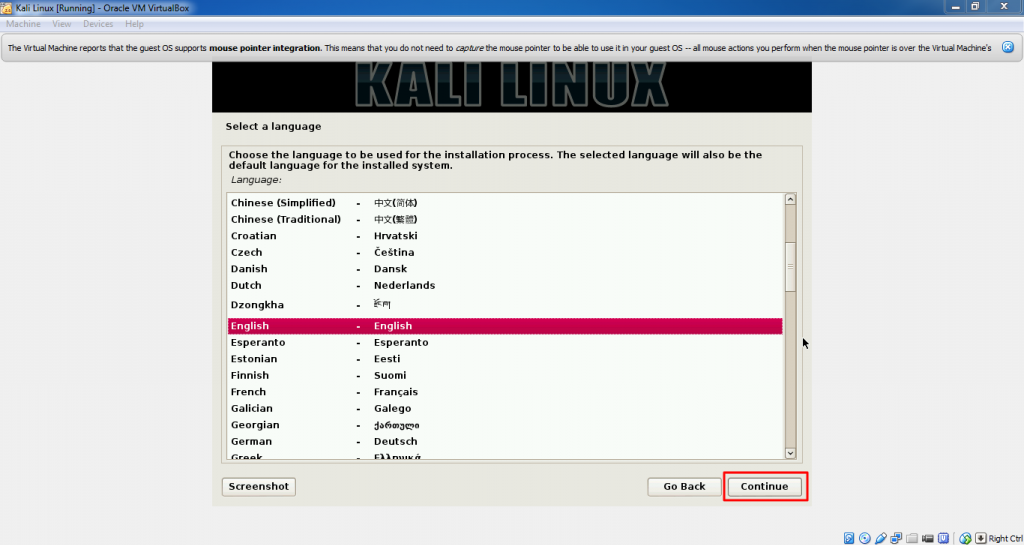
12. Select your location.
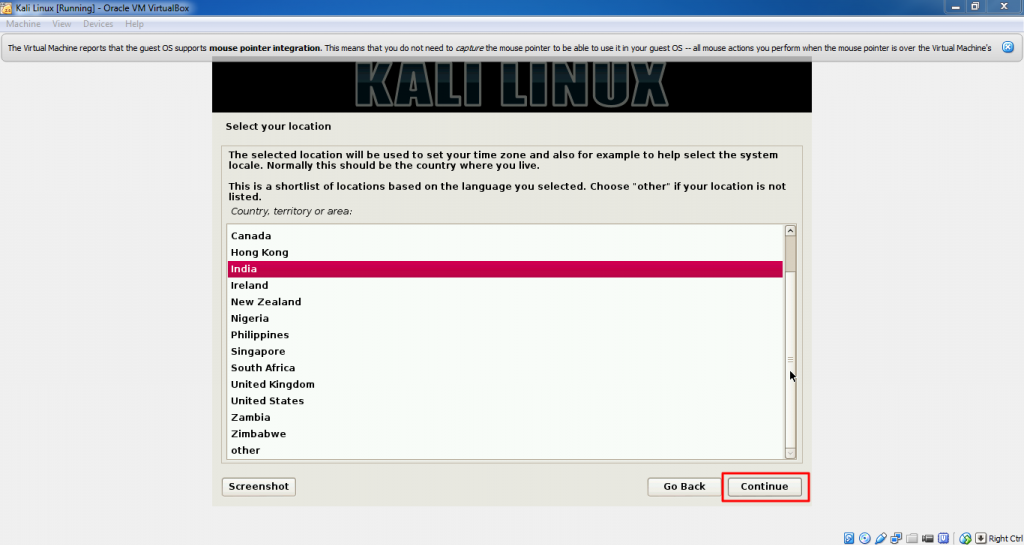
13. Select your keyboard layout and click continue.
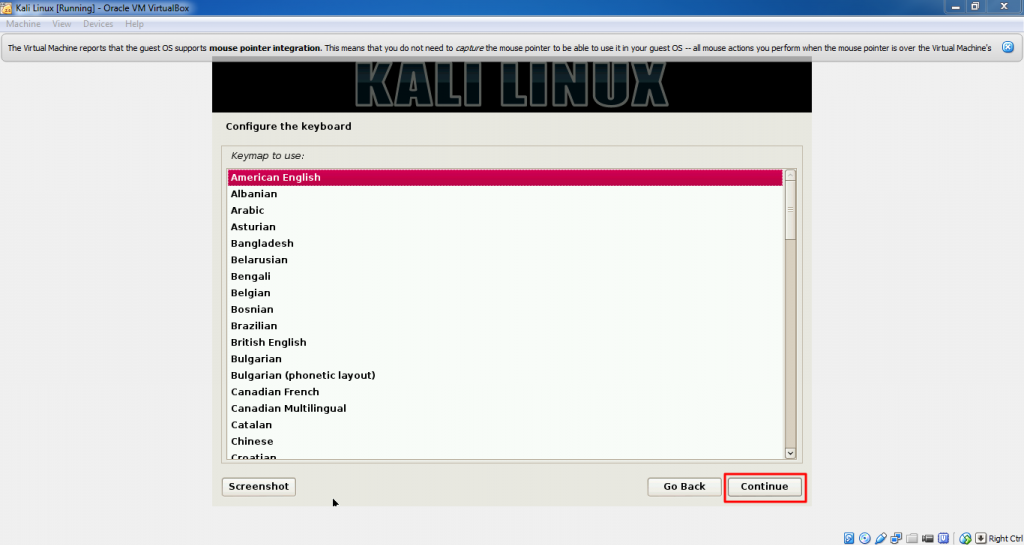
14. Installation will start loading the additional component.
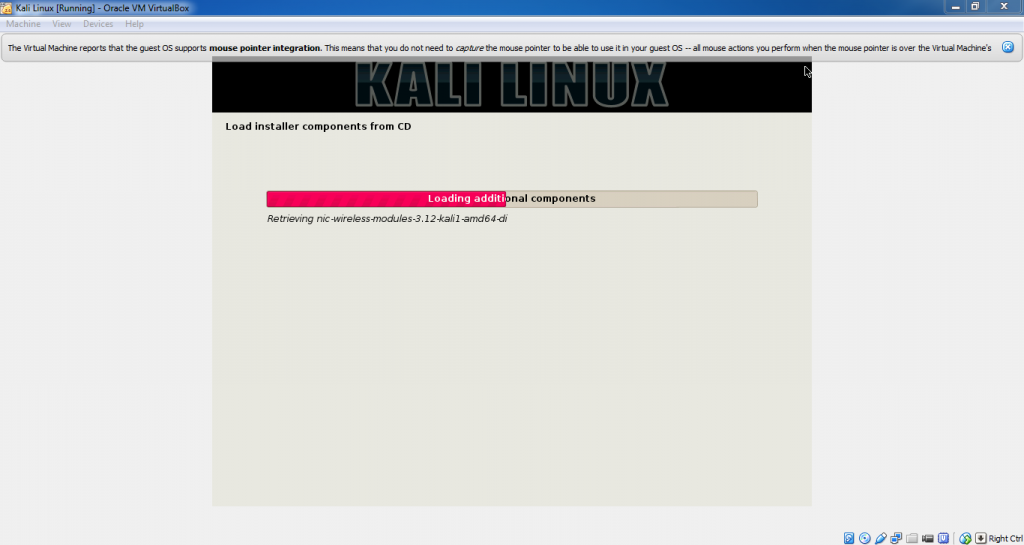
15. Now enter the hostname for your system. Leave it default to “Kali” and click continue.
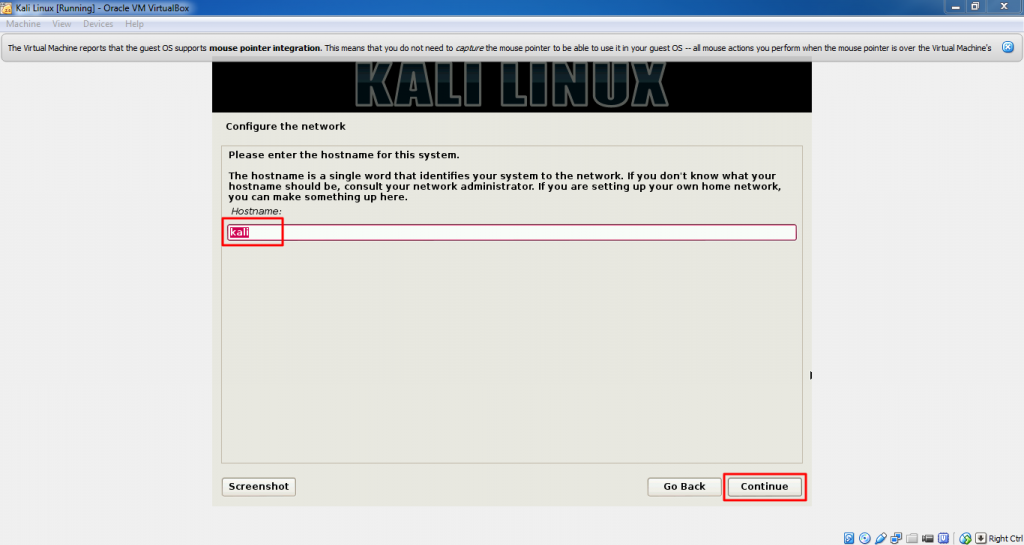
16. Enter the domain name, leave it blank if not using any specific domain.
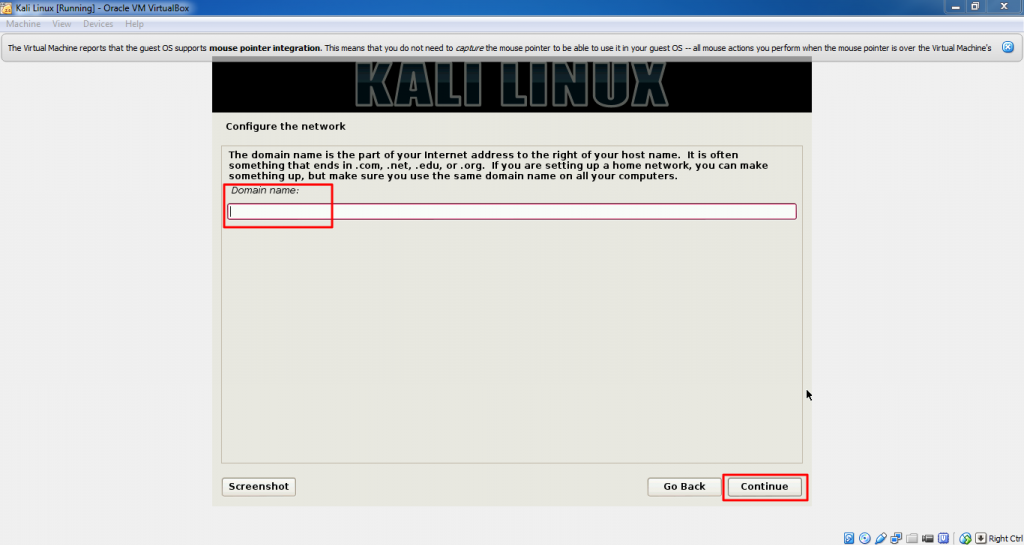
17. By default Kali user is Root, so enter password for it and click continue.
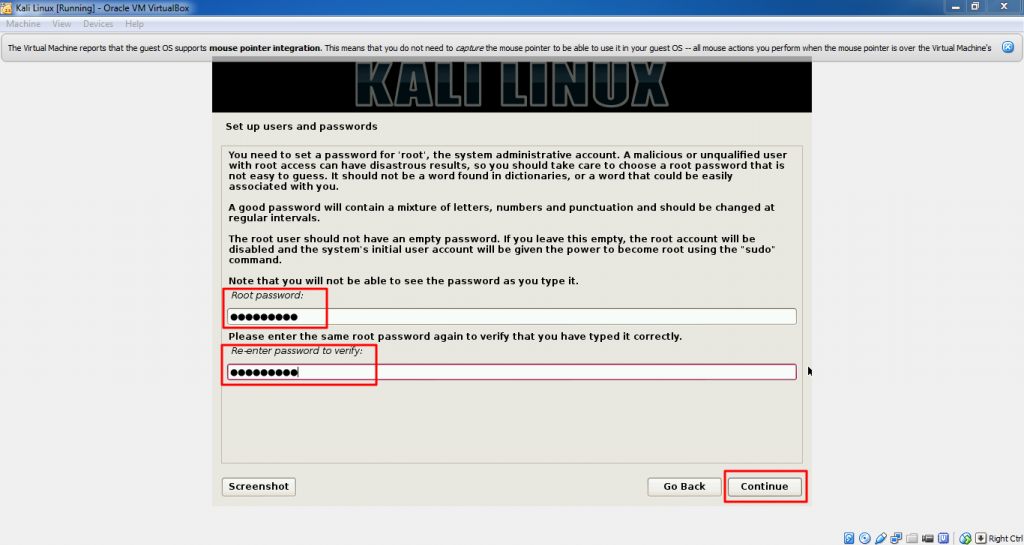
18. Use the entire disk for installation, if you are advance user, you can try other options as well.
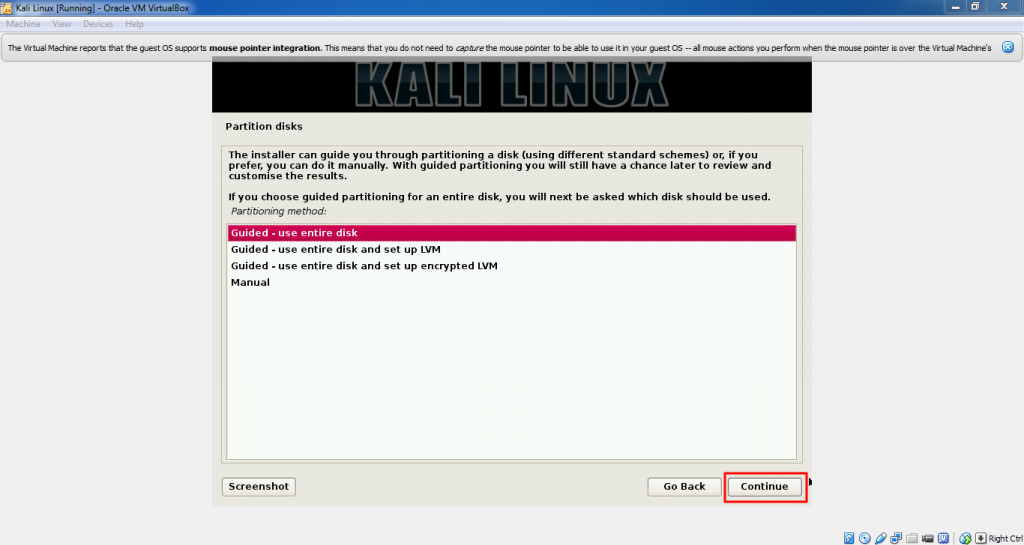
19. Select and continue the default virtual hard disk which we have created earlier.
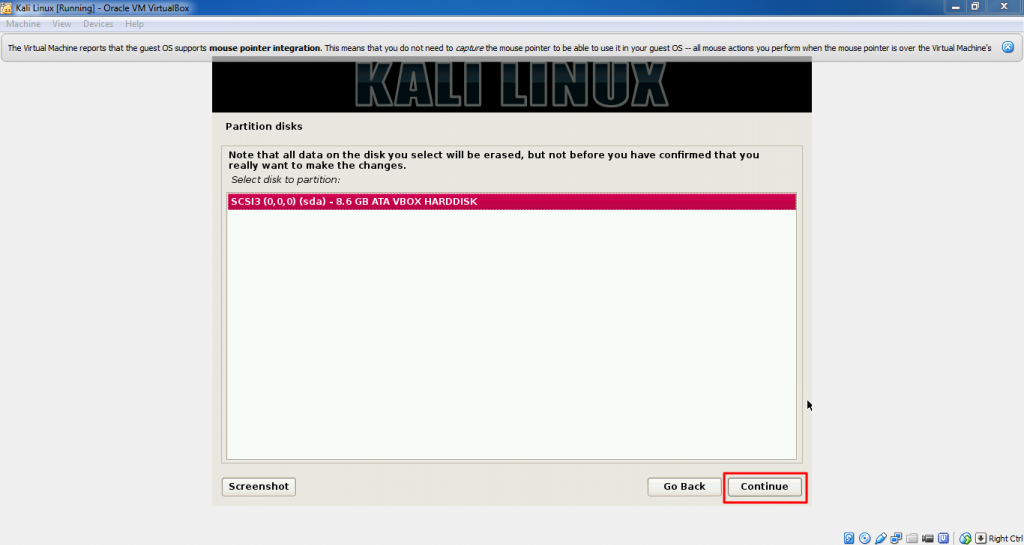
20. If you are new user to Kali linux, select “All files in one partition” option, else you can try other options for advance users.
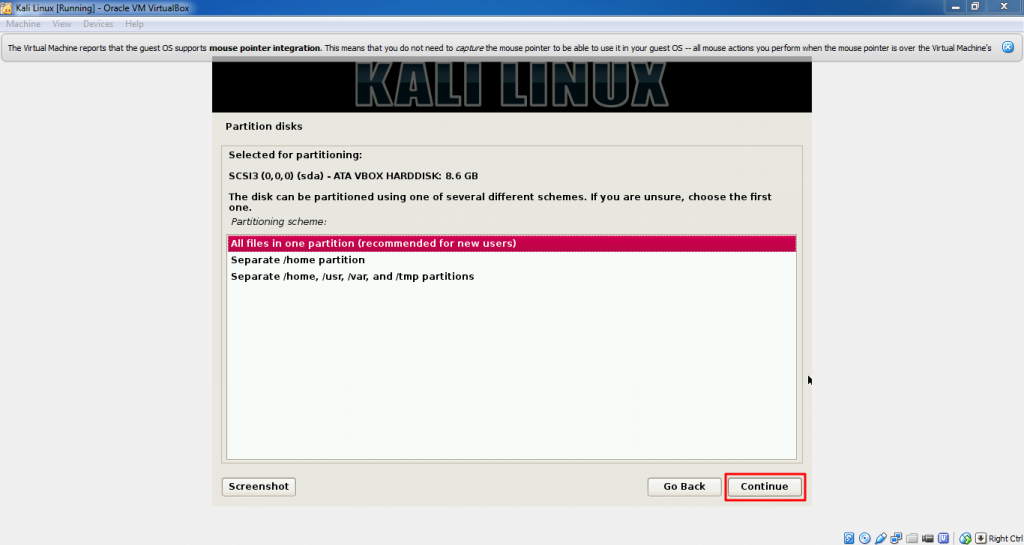
21. Confirm the virtual hard disk changes and click continue.
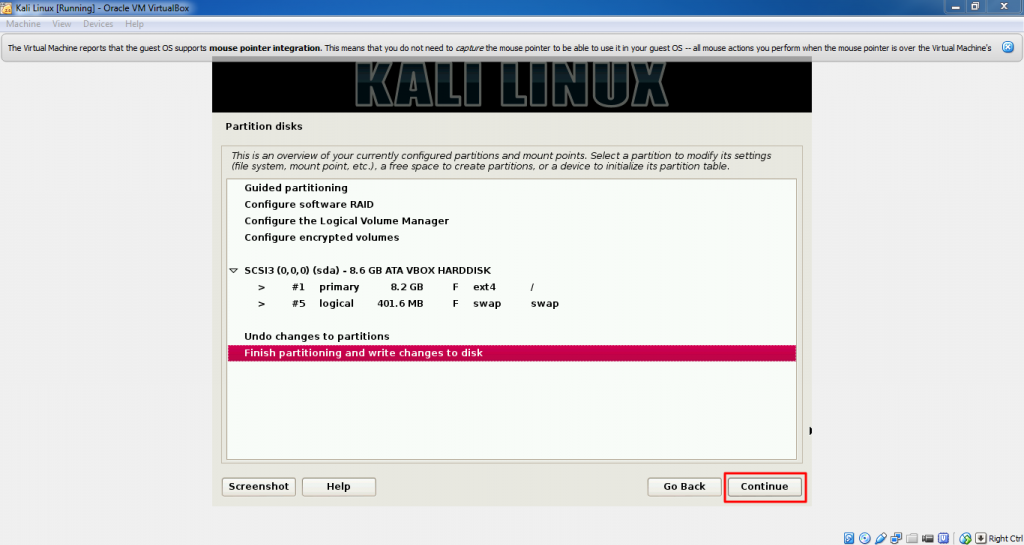
22. Confirm the changes, select “Yes” and click continue.
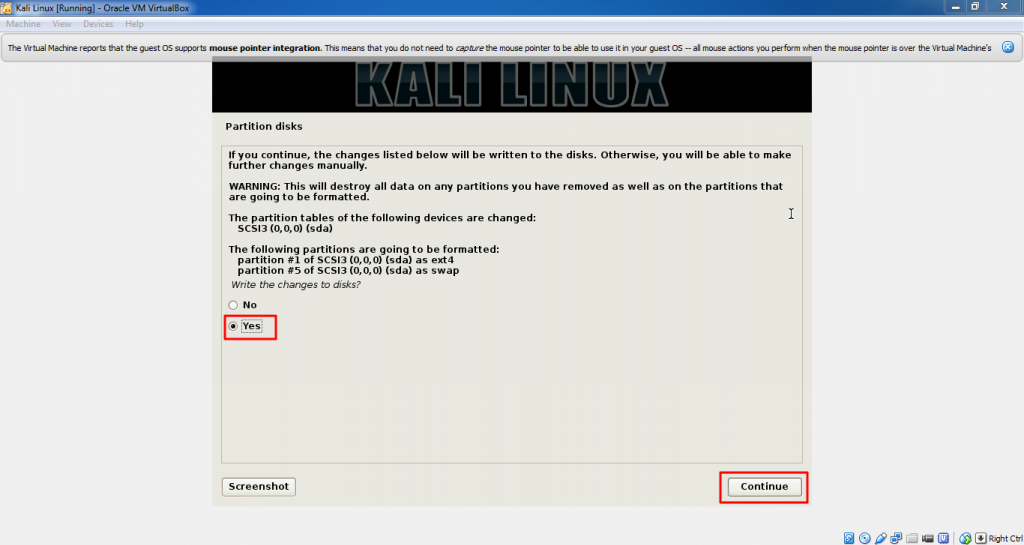
23. Installation will start now, it will take sometime around 5-10 minutes.
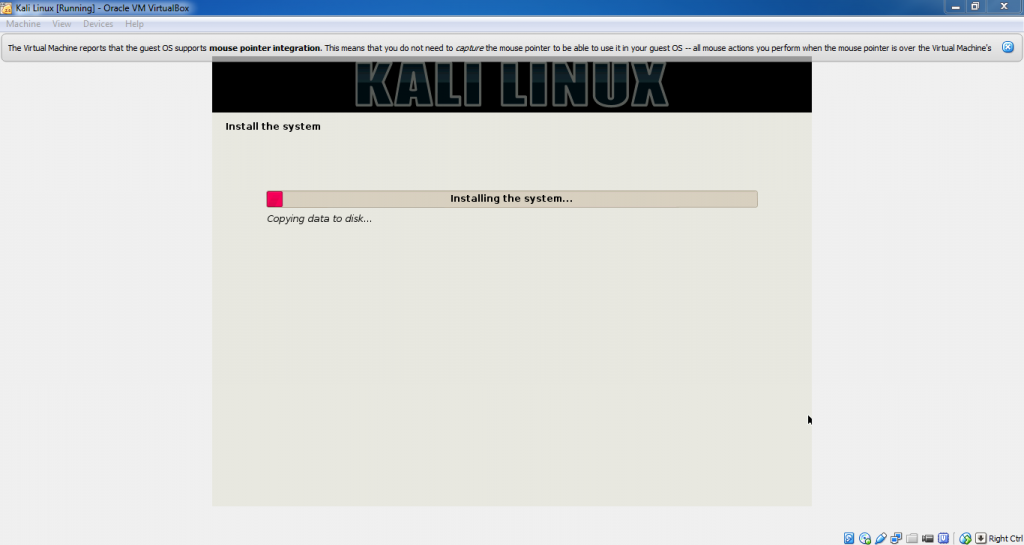
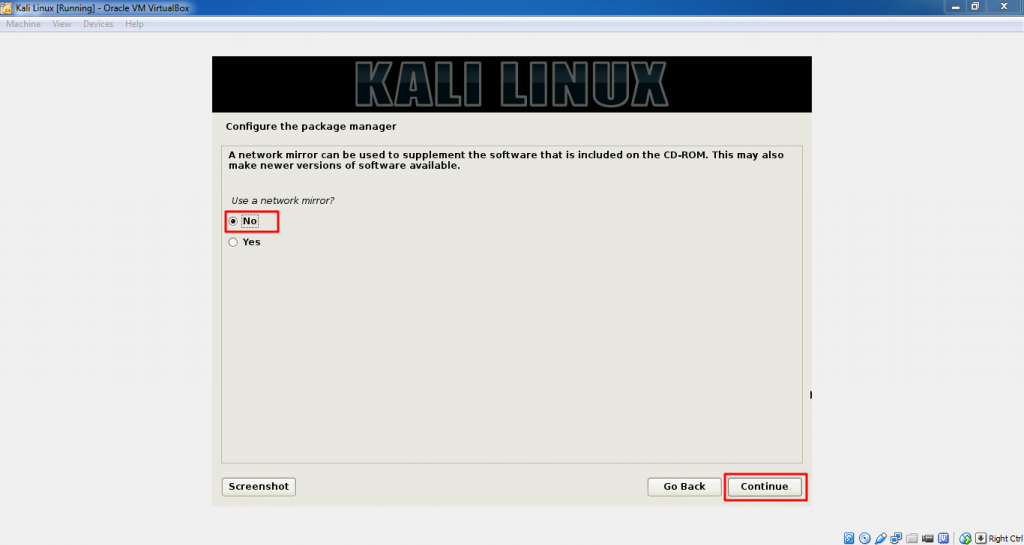
24. If you want to check newer versions of the software available then select Yes from “Network mirror” screen, else select No and click continue.
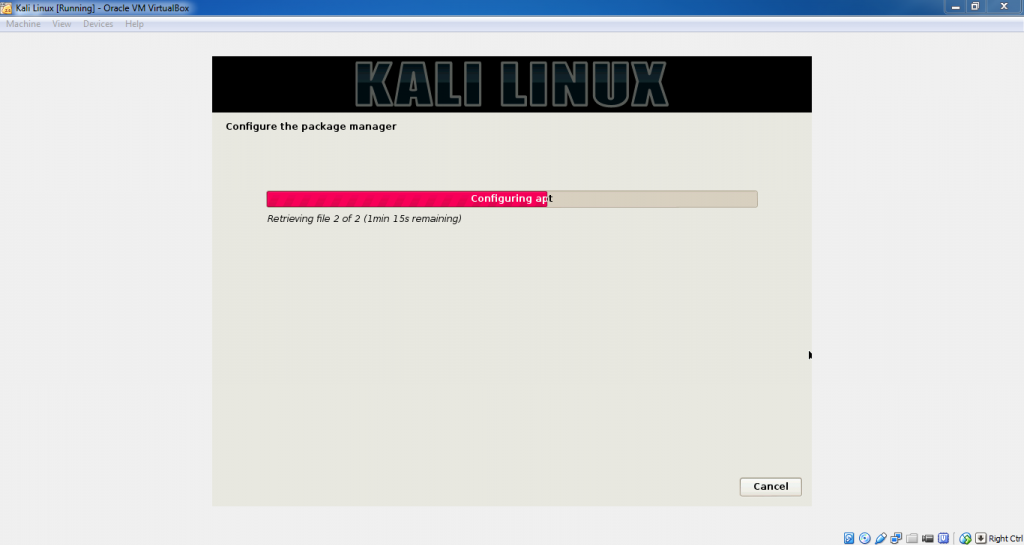
25. System will configure packages.
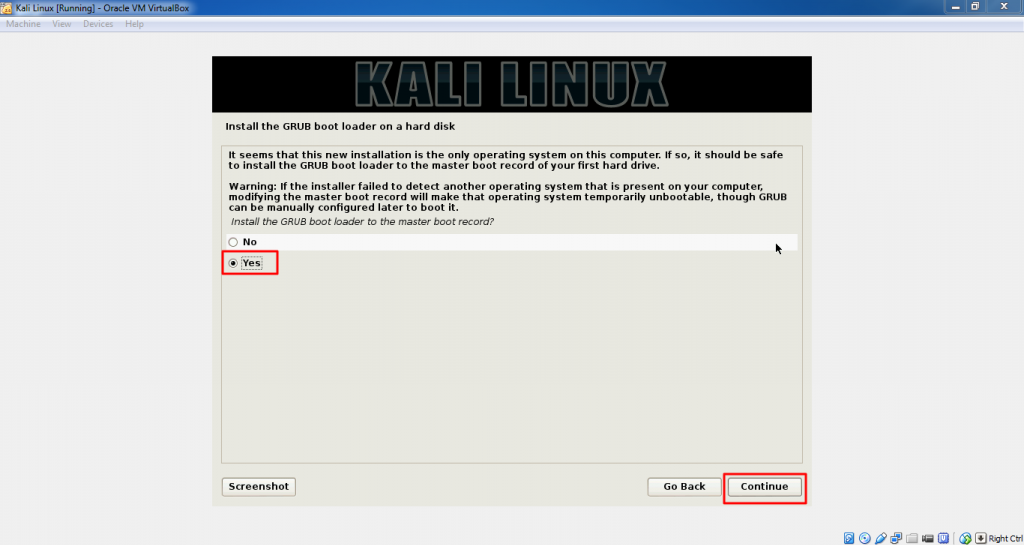
26. If we want to install grub loader then select Yes else select No option.
27. Once you get the “Installation Complete” screen, click continue.
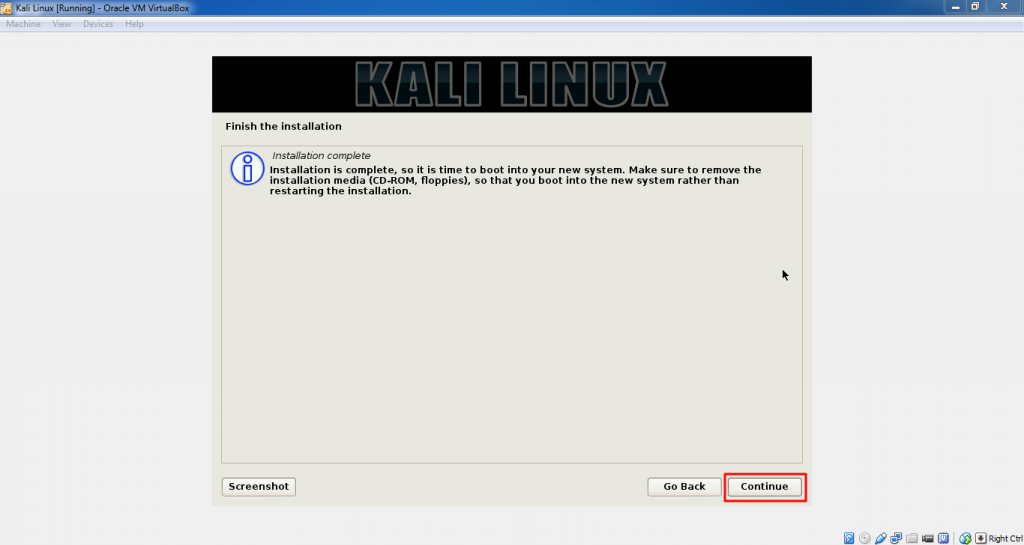
28. Once it finishes, system will restart. Since the default is the right selection, enter to boot into Kali linux.
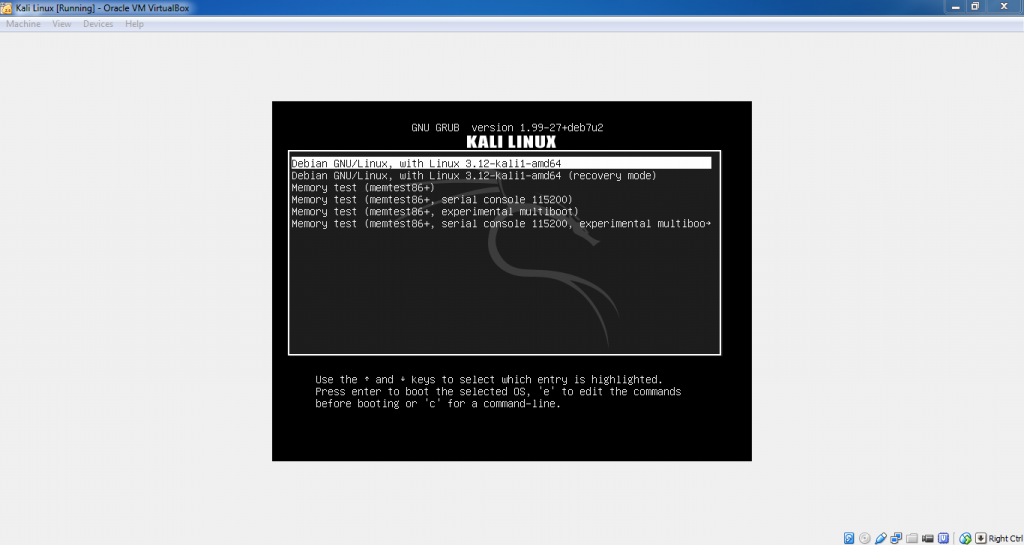
29. From the following screen, enter username and password.
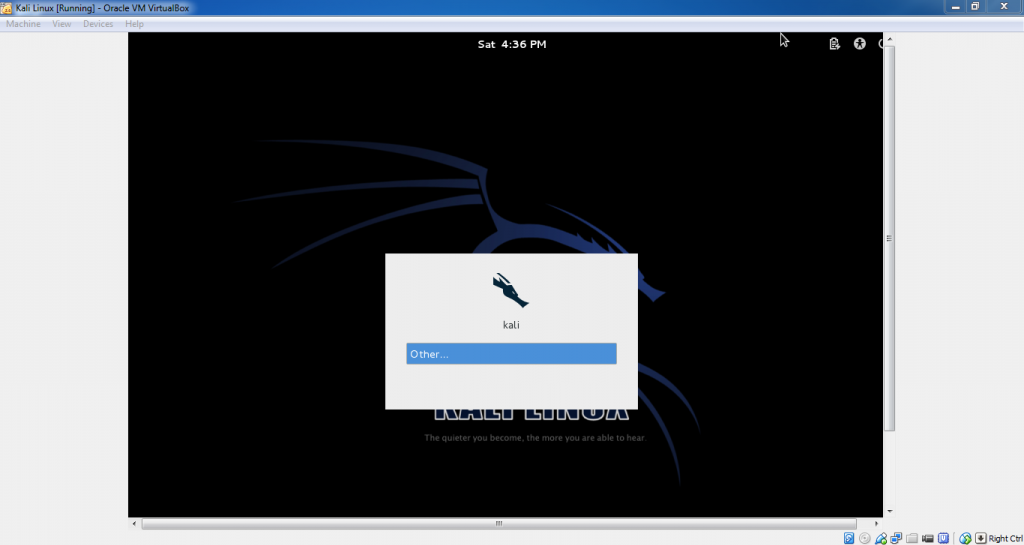
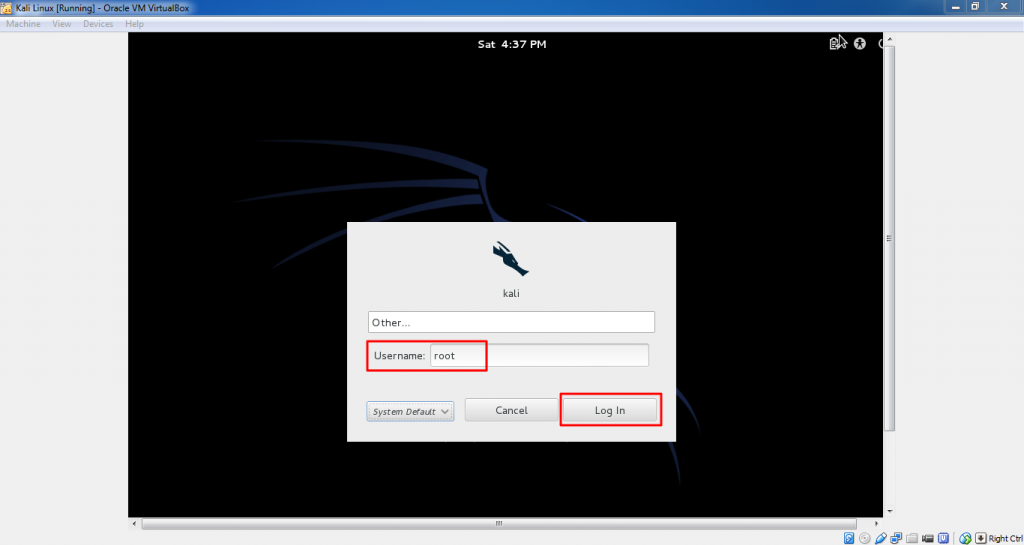
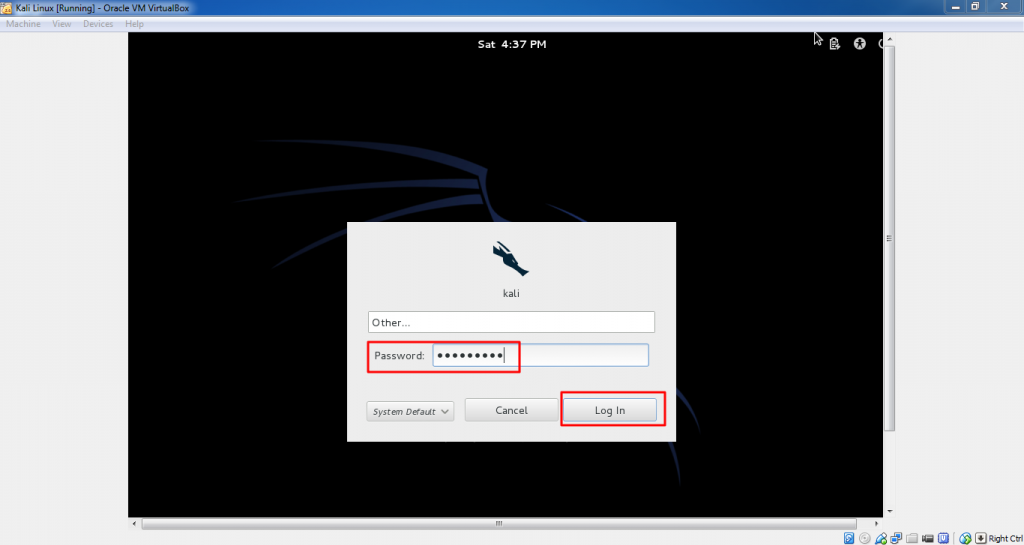
30. Since you are into Virtualbox, from the device menu, click on “Install Virtualbox guest additions”, a drive is mounted automatically.
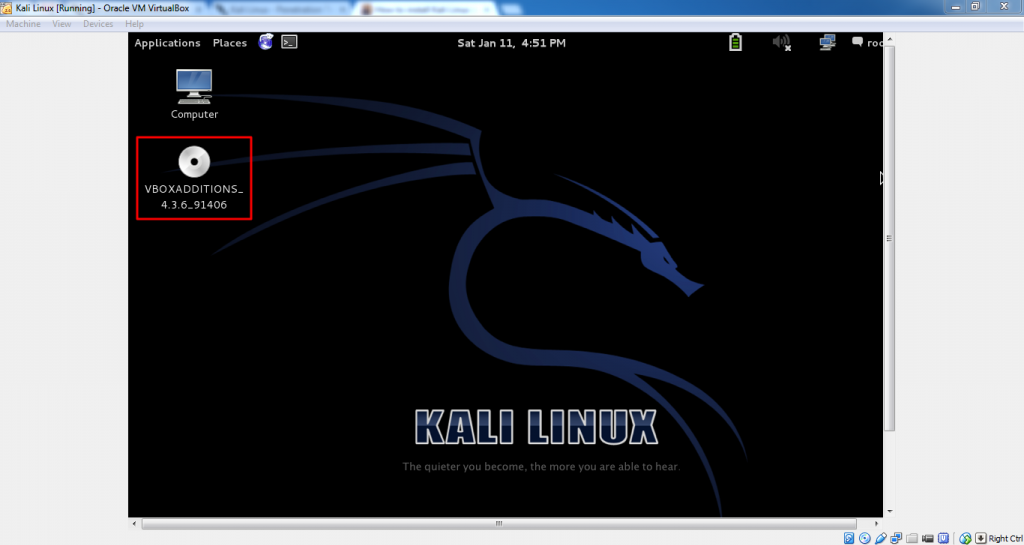
31. Copy the “VBoxLinuxAdditions.run” to the root directory using following command
cp VBoxLinuxAdditions.run /root/

32. Change the permissions of the file using command
chmod 755 /root/VBoxLinuxAdditions.run

33. Now, Navigate to the /root directory and execute the file using following command
./VBoxLinuxAdditions.run

34. After successfully installation reboot the system.
Hope this helps. For any queries / doubts, please comment below.



Kali Mini ISO Install

The Kali mini ISO is a convenient way to install a minimal Kali system and install it “from scratch”. The mini install ISO will download all required packages from our repositories, meaning you need to have a fast Internet connection to use this installation method.

Installation Prerequisites

  • A minimum of 8 GB disk space for the Kali Linux install.
  • For i386 and amd64 architectures, a minimum of 512MB RAM.
  • CD-DVD Drive / USB boot support

Preparing for the Installation

  1. Download the Kali mini ISO.
  2. Burn The Kali Linux ISO to DVD or Image Kali Linux Live to USB.
  3. Ensure that your computer is set to boot from CD / USB in your BIOS.

Kali Linux Installation Procedure

When you first boot the mini ISO, you will be presented with a small boot menu with various options. For this article, we will simply be doing a basic install.
mini_iso_1
You will next be prompted for various things such as your language and keyboard type, then you will need to select a hostname for your installation. We will stick with the default of kali.
mini_iso_2
Next, you will need to select your time zone, then you’ll be shown the partition options. To get up and running quickly, we will use ‘Guided – use entire disk’ and follow the prompts all the way through to create the new partitioning setup.
mini_iso_3
In order to reduce network bandwidth, a small subset of packages will be selected by default. If you wish to add different services or features, this is the area you would make your selections.
mini_iso_4
At this point, the installer will download all of the packages it requires and install them on the system. Depending on your Internet connectivity speed, this could take some time. Eventually, you will finally be prompted to install GRUB to finish the installation.
mini_iso_5

Setup a PXE Server

Booting and installing Kali over the network (PXE) can be useful from a single laptop install with no CDROM or USB ports, to enterprise deployments supporting pre-seeding of the Kali installation.
First, we need to install dnsmasq to provide the DHCP/TFTP server and then edit the dnsmasq.conffile.
apt-get install dnsmasq
nano /etc/dnsmasq.conf
In dnsmasq.conf, enable DHCP, TFTP and PXE booting as shown below, changing the dhcp-range to match your environment:
interface=eth0
dhcp-range=192.168.8.100,192.168.8.254,12h
dhcp-boot=pxelinux.0
enable-tftp
tftp-root=/tftpboot/
With the edits in place, the dnsmasq service needs to be restarted in order for the changes to take effect.
service dnsmasq restart

Download Kali PXE Netboot Images

Now, we need to create a directory to hold the Kali Netboot image and download the image we wish to serve from the Kali repos.
mkdir -p /tftpboot
cd /tftpboot
# for 64 bit systems:
wget http://repo.kali.org/kali/dists/kali/main/installer-amd64/current/images/netboot/netboot.tar.gz
# for 32 bit systems:
wget http://repo.kali.org/kali/dists/kali/main/installer-i386/current/images/netboot/netboot.tar.gz
tar zxpf netboot.tar.gz
rm netboot.tar.gz

Configure Target to Boot From Network

With everything configured, you can now boot your target system and configure it to boot from the network. It should get an IP address from your PXE server and begin booting Kali.
Source From - http://docs.kali.org/network-install/kali-linux-network-mini-iso-install


First Download Kali linux from here


Kali Linux Installation Requirements

Installing Kali Linux on your computer is an easy process. First, you’ll need compatible computer hardware. Kali is supported on i386, amd64, and ARM (both armel and armhf) platforms. The hardware requirements are minimal as listed below, although better hardware will naturally provide better performance. The i386 images have a default PAE kernel, so you can run them on systems with over 4GB of RAM. Download Kali Linux and either burn the ISO to DVD, or prepare a USB stick with Kali Linux Live as the installation medium. If you do not have a DVD drive or USB port on your computer, check out the Kali Linux Network Install.

Installation Prerequisites

  • A minimum of 8 GB disk space for the Kali Linux install.
  • For i386 and amd64 architectures, a minimum of 512MB RAM.
  • CD-DVD Drive / USB boot support

Preparing for the Installation

  1. Download Kali linux.
  2. Burn The Kali Linux ISO to DVD or Image Kali Linux Live to USB.
  3. Ensure that your computer is set to boot from CD / USB in your BIOS.

Kali Linux Installation Procedure

  1. To start your installation, boot with your chosen installation medium. You should be greeted with the Kali Boot screen. Choose either Graphical or Text-Mode install. In this example, we chose a GUI install.Kali Install
  2. Select your preferred language and then your country location. You’ll also be prompted to configure your keyboard with the appropriate keymap.localechooser_languagelist_0
  3. The installer will copy the image to your hard disk, probe your network interfaces, and then prompt you to enter a hostname for your system. In the example below, we’ve entered “kali” as our hostname.netcfg_get_hostname_0
  4. Enter a robust password for the root account.kali-linux-install-02
  5. Next, set your time zone.time_zone_0
  6. The installer will now probe your disks and offer you four choices. In our example, we’re using the entire disk on our computer and not configuring LVM (logical volume manager). Experienced users can use the “Manual” partitioning method for more granular configuration options.partman-auto_init_automatically_partition_0
  7. Next, you’ll have one last chance to review your disk configuration before the installer makes irreversible changes. After you click Continue, the installer will go to work and you’ll have an almost finished installation.kali-linux-install-03
  8. Configure network mirrors. Kali uses a central repository to distribute applications. You’ll need to enter any appropriate proxy information as needed.
    NOTE! If you select “NO” in this screen, you will NOT be able to install packages from Kali repositories.
    kali-linux-install-04
  9. Next, install GRUB.kali-linux-install-05
  10. Finally, click Continue to reboot into your new Kali installation.finish-install_reboot_in_progress_0

Kali Linux Dual Boot with Windows

Installing Kali alongside a Windows installation can be quite useful. However, you need to exercise caution during the setup process. First, make sure that you’ve backed up any important data on your Windows installation. Since you’ll be modifying your hard drive, you’ll want to store this backup on external media. Once you’ve completed the backup, we recommend you peruseKali Linux Hard Disk Install, which explains the normal procedure for a basic Kali install.
In our example, we will be installing Kali Linux alongside an installation of Windows 7, which is currently taking up 100% of the disk space in our computer. We will start by resizing our current Windows partition to occupy less space and then proceed to install Kali Linux in the newly-created empty partition.
Download Kali Linux and either burn the ISO to DVD, or prepare a USB stick with Kali linux Live as the installation medium. If you do not have a DVD or USB port on your computer, check out theKali Linux Network Install. Ensure you have:
  • Minimum of 8 GB free disk space on Windows
  • CD-DVD / USB boot support

Preparing for the Installation

  1. Download Kali Linux.
  2. Burn The Kali Linux ISO to DVD or copy Kali Linux Live to USB.
  3. Ensure that your computer is set to boot from CD / USB in your BIOS.

Dual Boot Installation Procedure

  1. To start your installation, boot with your chosen installation medium. You should be greeted with the Kali Boot screen. Select Live, and you should be booted into the Kali Linux default desktop.
  2. Now launch the gparted program. We’ll use gparted to shrink the existing Windows partition to give us enough room to install Kali Linux.dual-boot-kali-01
  3. Select your Windows partition. Depending on your system, it will usually be the second, larger partition. In our example, there are two partitions; the first is the System Recovery partition, and Windows is actually installed in /dev/sda2. Resize your Windows partition and leave enough space (8GB minimum) for the Kali installation.dual-boot-kali-03
  4. Once you have resized your Windows partition, ensure you “Apply All Operations” on the hard disk. Exit gparted and reboot.
    dual-boot-kali-05

Kali Linux Installation Procedure

  1. The installation procedure from this point onwards is similar to a Kali Linux Hard Disk install, until the point of the partitioning, where you need to select “Guided – use the largest continuous free space” that you created earlier with gparted. dual-boot-kali-09
  2. Once the installation is done, reboot. You should be greeted with a GRUB boot menu, which will allow you to boot either into Kali or Windows.
    dual-boot-kali-11
Booting and installing Kali from a USB stick is our favorite and fastest method of getting up and running. In order to do this, we first need to create the Kali ISO image on a USB drive. If you would like to add persistence to your Kali Linux USB stick, please read the full document before proceeding to create your image.

Preparing for the USB copy

  1. Download Kali linux.
  2. If running Windows, download Win32 Disk Imager.
  3. No special software is needed for a *nix OS.
  4. A USB Key (at least 2GB capacity).

Kali Linux Live USB Install Procedure

Imaging Kali on a Windows Machine

    1. Plug your USB stick into your Windows USB port and launch the Win32 Disk Imager software
    2. Choose the Kali Linux ISO file to be imaged and verify that the USB drive to be overwritten is the correct one.
kali-usb-install-windows
  1. Once the imaging is complete, safely eject the USB drive from the Windows machine. You can now use the USB device to boot into Kali Linux.

Imaging Kali on a Linux Machine

Creating a bootable Kali Linux USB key in a Linux environment is easy. Once you’ve downloaded your Kali ISO file, you can use dd to copy it over to your USB stick as follows:
WARNING. Although the process of imaging Kali on a USB stick is very easy, you can just as easily destroy arbitrary partitions with dd if you do not understand what you are doing. Consider yourself warned.
  1. Plug in your USB device to your Linux computer’s USB port.
  2. Verify the device path of your USB storage with dmesg.
  3. Proceed to (carefully!) image the Kali ISO file on the USB device:
 dd if=kali.iso of=/dev/sdb bs=512k
That’s it, really! You can now boot into a Kali Live / Installer environment using the USB device.

Adding Persistence to Your Kali Live USB

Adding persistence (the ability to save files and changes across live boots) to your Kali Linux image can be very useful in certain situations. To make your Kali Linux USB stick persistent, follow these steps. In this example, we assume our USB drive is /dev/sdb. If you want to add persistence, you’ll need a larger USB device than we listed in our prerequisites above.
    1. Image the Kali Linux ISO to your USB stick as explained above, using the “Linux Method” and dd.
    2. Create and format an additional partition on the USB stick. In our example, we use gpartedby invoking:
       gparted /dev/sdb
    3. Your current partitioning scheme should look similar to this:usb-persistence-basic-partitioning
    4. Proceed to format a new partition of your desired size to be used for persistence. In our example, we used all the remaining space available. Make sure the volume label of the newly created partition is persistence, and format it using the ext4 filesystem.
      usb-persistence-creating-partition
    5. Once the process is complete, mount your persistence USB partition using the following commands:
       mkdir /mnt/usb
      mount /dev/sdb2 /mnt/usb
      echo ”/ union” >> /mnt/usb/persistence.conf
      umount /mnt/usb
    6. Plug the USB stick into the computer you want to boot up. Make sure your BIOS is set to boot from your USB device. When the Kali Linux boot screen is displayed, select “Live boot” from the menu (don’t press enter), and press the tab button. This will allow you to edit the boot parameters. Add the word “persistence” to the end of the boot parameter line each time you want to mount your persistent storage.
      usb-persistence


At times, we have sensitive data we would prefer to encrypt using full disk encryption. With the Kali Installer, you can initiate an LVM encrypted install on either Hard Disk or USB drives. The installation procedure is very similar to a “normal Kali Linux Install”, with the exception of choosing an Encrypted LVM partition during the installation process.

Kali Linux Encrypted Installation Requirements

Installing Kali Linux on your computer is an easy process. First, you’ll need compatible computer hardware. The hardware requirements are minimal as listed below, though better hardware will naturally provide better performance. The i386 images have a default PAE kernel, so you can run them on systems with over 4GB of RAM. Download Kali Linux and either burn the ISO to DVD, orprepare a USB stick with Kali Linux Live as the installation medium.

Installation Prerequisites

  • A minimum of 8 GB disk space for the Kali Linux install.
  • For i386 and amd64 architectures, a minimum of 512MB RAM.
  • CD-DVD Drive / USB boot support

Preparing for the Installation

  1. Download Kali linux.
  2. Burn The Kali linux ISO to DVD or Image Kali Linux Live to USB.
  3. Ensure that your computer is set to boot from CD / USB in your BIOS.

Kali Linux Installation Procedure

  1. To start your installation, boot with your chosen installation medium. You should be greeted with the Kali Linux boot menu. Choose a Graphical or a Text-Mode install. In this example, we chose a GUI install.Kali Install
  2. Select your preferred language and then your country location. You’ll also be prompted to configure your keyboard with the appropriate keymap.localechooser_languagelist_0
  3. The installer will copy the image to your hard disk, probe your network interfaces, and then prompt you to enter a hostname for your system. In the example below, we’ve entered “kali” as the hostname.netcfg_get_hostname_0
  4. Enter a robust password for the root account.kali-linux-install-02
  5. Next, set your time zone.time_zone_0
  6. The installer will now probe your disks and offer you four choices. For an Encrypted LVM install, choose the “Guided – use entire disk and set up encrypted LVM” option as shown below.partman-auto_init_automatically_partition_0
  7. Choose the destination drive to install Kali. In this case, we chose a USB drive destination. We will use this USB drive to boot an encrypted instance of Kali.kali-linux-install-03
  8. Confirm your partitioning scheme and continue the installation.kali-linux-install-03
  9. Next, you will be asked for an encryption password. You will need to remember this password and use it each time to boot the encrypted instance of Kali Linux.kali-linux-install-03
  10. Configure network mirrors. Kali uses a central repository to distribute applications. You’ll need to enter any appropriate proxy information as needed.
    NOTE! If you select “NO” in this screen, you will NOT be able to install packages from the Kali repositories.
    kali-linux-install-04
  11. Next, install GRUB.kali-linux-install-05
  12. Finally, click Continue to reboot into your new Kali installation. If you used a USB device as a destination drive, make sure you enable booting from USB devices in your BIOS. You will be asked for the encryption password you set earlier on every boot.finish-install_reboot_in_progress_0
Source From - http://docs.kali.org/category/installation