

There is no shortage of Twitter clients available, differing in terms of features, operating system support, interface, mobile capabilities, etc. If you are one of those command line junkies, there is one for you as well.
A single-letter tool called "t" is a command-line Twitter client written in Ruby. Despite its bare-bone user interface, Twitter CLI t
in fact boasts of pretty powerful features such as deeper history
search, multi-threaded API access, spreadsheet integration, etc. On top
of that, you can pipe its formatted output to all kinds of other CLI
tools, so its possible use cases are virtually limitless.
In this tutorial, I am going to demonstrate how to access Twitter from the command line using Twitter CLI. Installation and basic usage examples will be covered.
Install Twitter CLI on Linux
To install Twitter CLI on Debian, Ubuntu or Linux Mint:
$ sudo apt-get install ruby-dev
$ sudo gem install t
To install Twitter CLI on CentOS, Fedora or RHEL:$ sudo gem install t
$ sudo yum install ruby-devel
$ sudo gem install t
$ sudo gem install t
Configure Twitter CLI
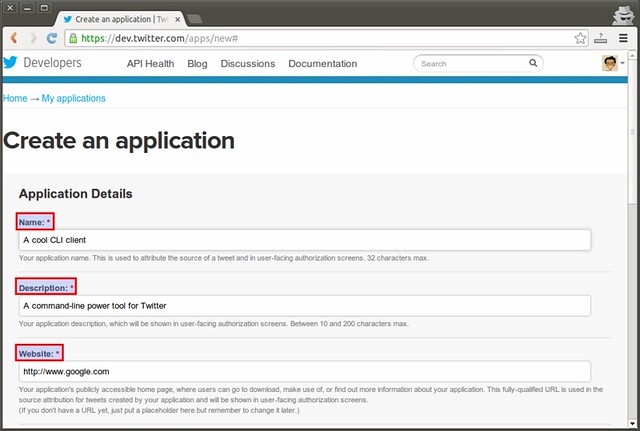
The first step is to create a Twitter application. Don't get scared. This is just a simple procedure of filling out a form. Go to https://dev.twitter.com/apps/new
(Twitter log in necessary). You will see a form where you can fill out
info about your app. Simply fill in three fields: name, description,
and website. The name of your app needs to be unique across all Twitter
users, and cannot contain a word "twitter". The website can be
arbitrary (e.g., google.com).
You can leave a callback URL blank. Click on the checkbox for
developer terms agreement at the bottom of the page, and click on
"Create your Twitter application" button. Once your app is successfully created, you will see a page where you
can manage your app settings, as shown below. Go to "Settings" tab.
Under "Application Type", change "Access" type to "Read, Write and
Access direct messages", and save the change.
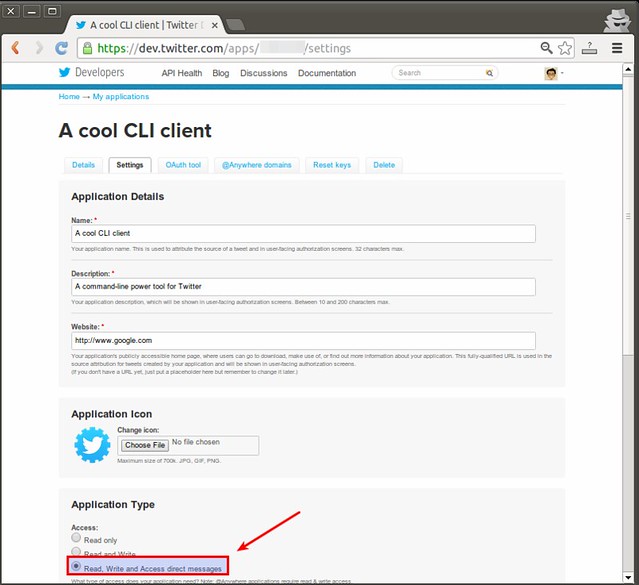
Reload the page to make sure that your change was saved properly.
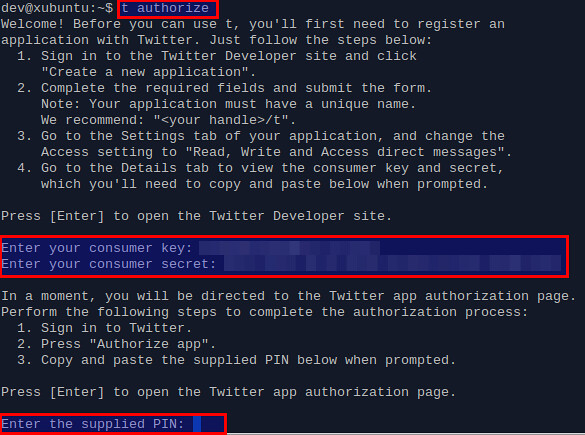
The next step is to authorize your app to access your Twitter account. For that, run the following command.
$ t authorize
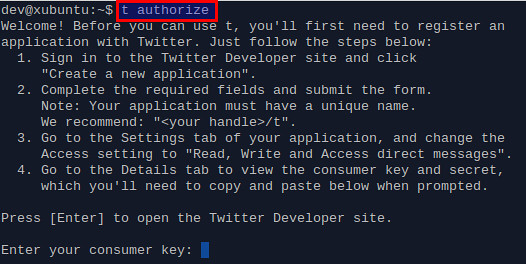
You will be prompted to press [Enter]. If you do, it will pop up a web browser window which will direct you to https://dev.twitter.com/apps (log in necessary), where you will see an app that you created earlier.
Click on your app link. Then go to "Details" tab in the app page.
Under "OAuth settings", you will find consumer key and secret.

Enter the key and secret in the same terminal where you run t.
You will then be asked to press [Enter] again to go to Twitter app
authorization page. Pressing [Enter] will pop up another web browser
window as shown below.
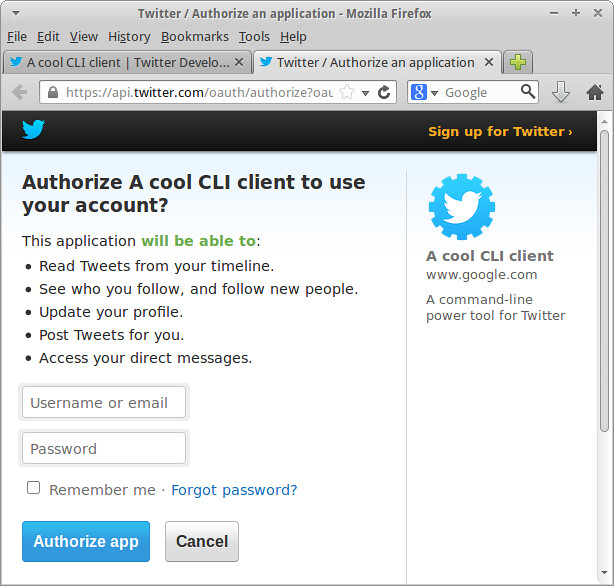
Authorize your app by entering your Twitter login credential and click on "Authorize app" button.
At the end of app authorization, you will get a PIN number. Enter this PIN number where you are prompted in the terminal.
If you should see "Authorization successful" message, you are ready to use Twitter CLI.
The account access info will be stored in ~/.trc as a plain text. So
make sure that this file is readable to you only, because whoever has a
copy of this file can access your Twitter account.
Access Your Twitter Account from CLI
To verify that your Twitter account is accessible from the CLI, run the command below, which will list your Twitter account if everything is set up correctly.
$ t account
Below are some common Twitter CLI examples.To get detailed info about a user:
$ t whois @xmodulo
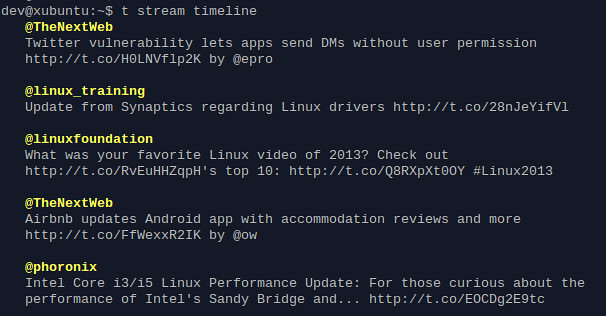
To start streaming your Twitter timeline in real time:
$ t stream timeline
To compose and post a new tweet:
$ t update "Hello there"
To follow user(s):
$ t follow @xmodulo @linuxfoundation
To show the last 10 tweets that mentioned you:
$ t mentions -n 10
To search for tweets containing a keyword in your timeline:
$ t search timeline "linux"
For more complex usage examples, refer to the official documentation.


facebook
twitter
google+
fb share